


Build your own AI-Powered Alexa/Siri to control your lights in a realtime convo.
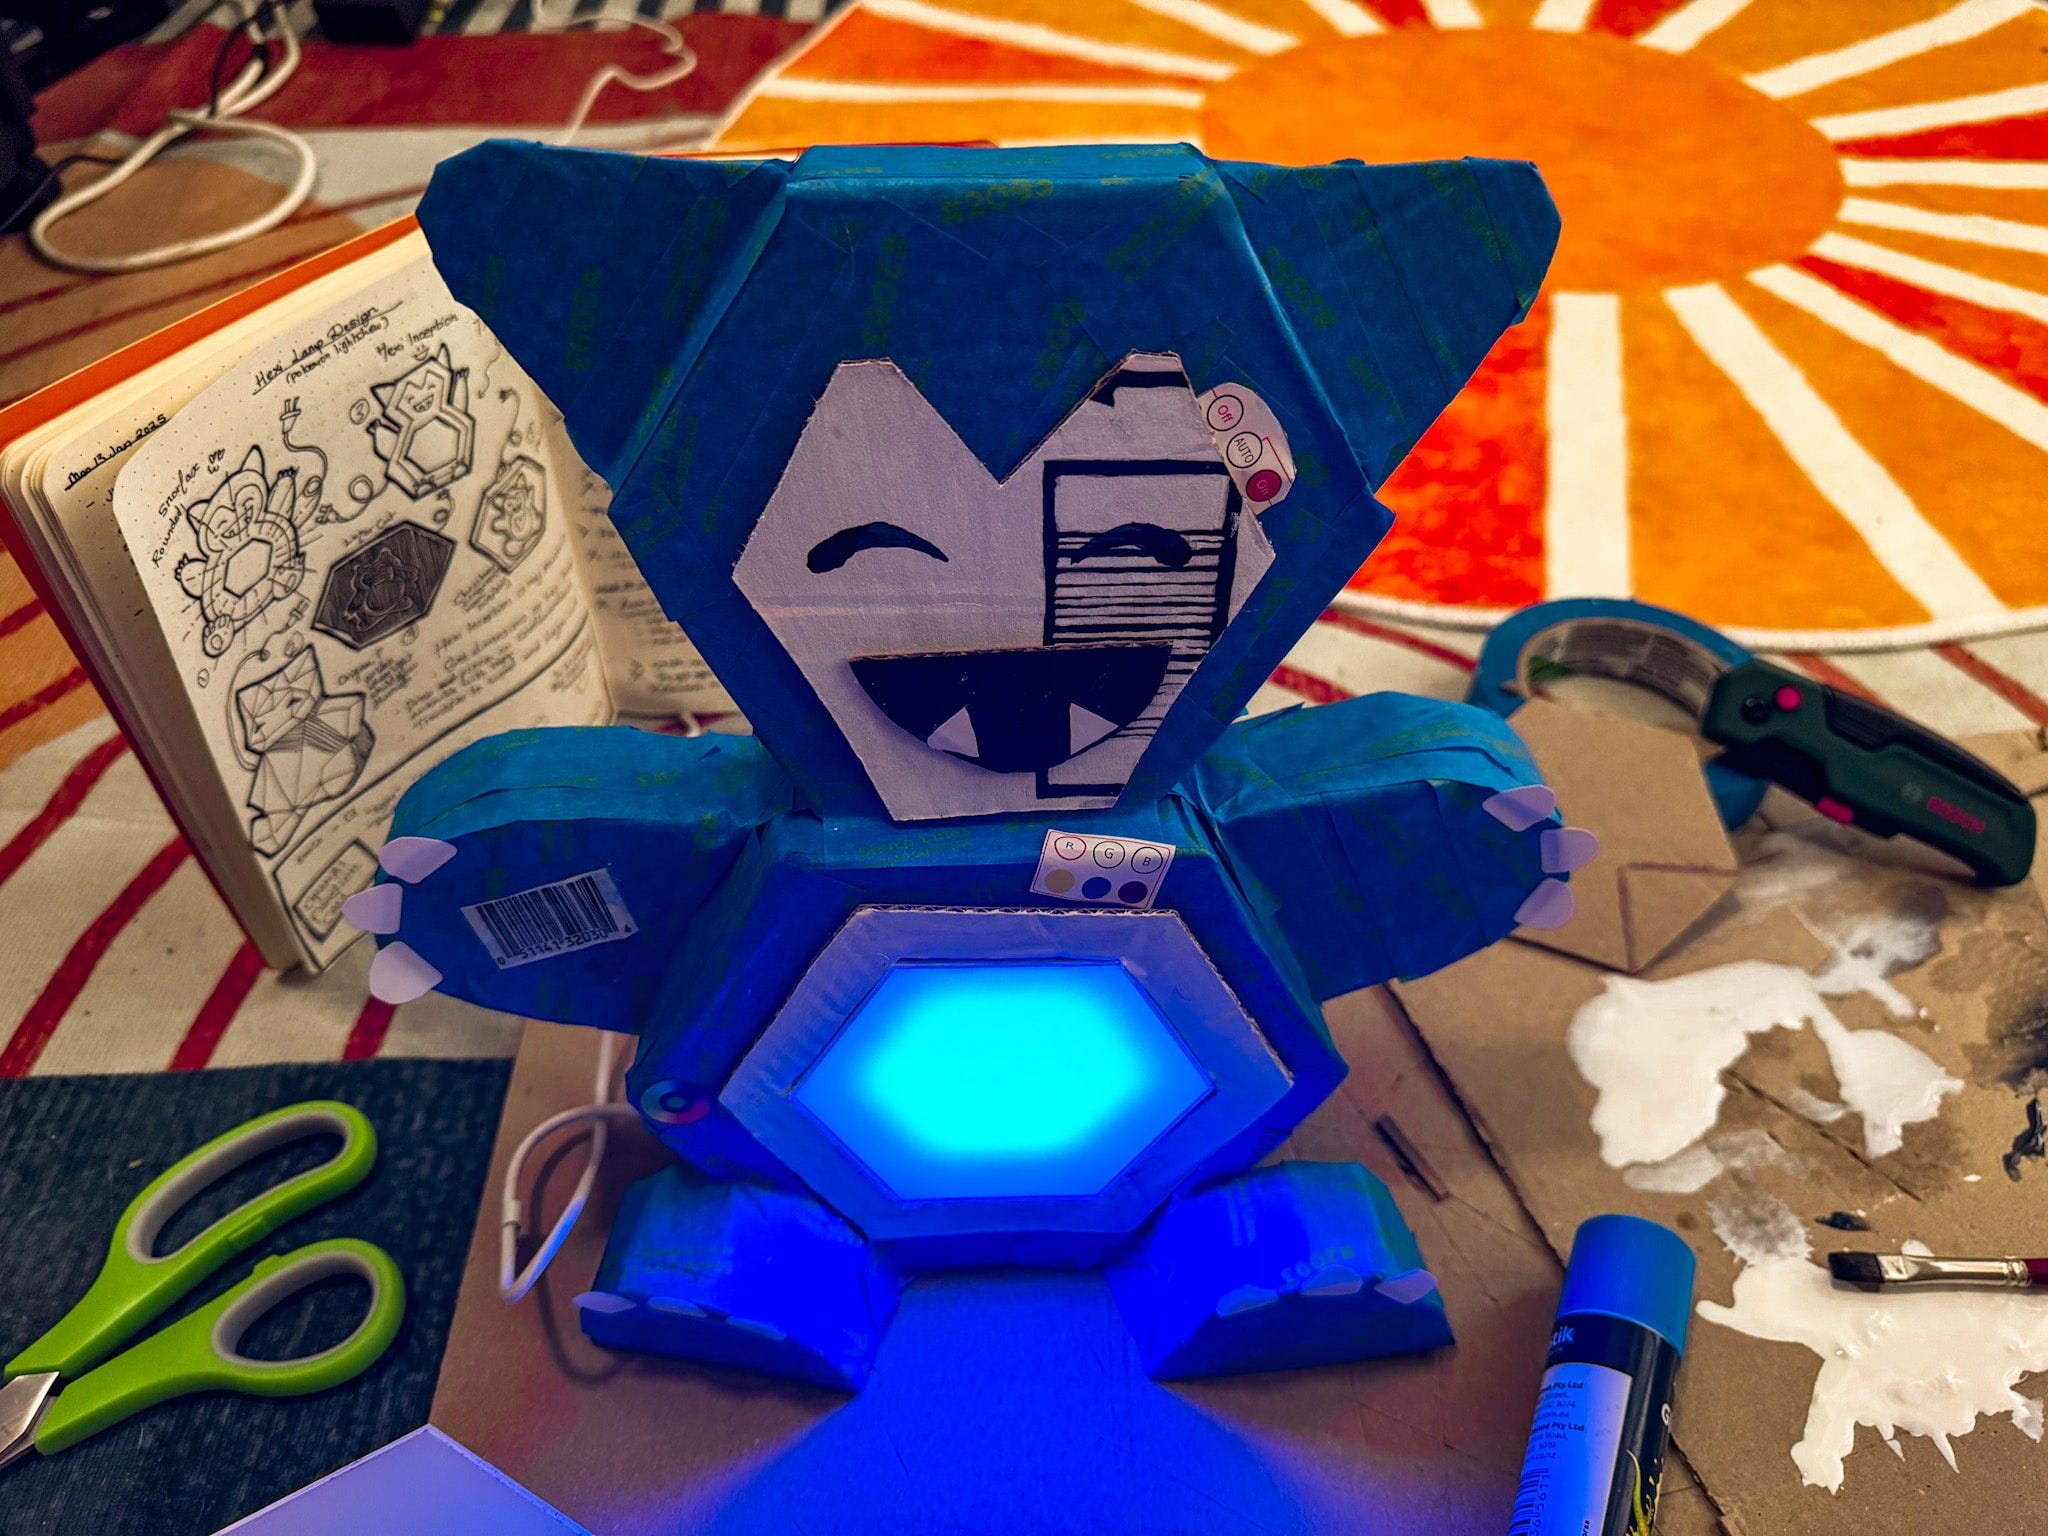
Check out this Snorlax lamp which changes colour to match the Pokémon I mention in a speech-to-speech convo! Learn how to use OpenAI's realtime API yourself.
Forwarded this email? Subscribe here for more ✨
Welcome to the 14th edition of the 100 GenAI MVPs newsletter, a journey all about shipping 100 happy and helpful GenAI solutions, and how to build them! 🚀👩💻✨ Together, we built a Robot Panda you can chat with (🏆 award winner), a video clip extractor (Men In Black edition), and many more!
Great for anyone curious about the possibilities of AI, perfect for technical AI builders 🤖🛠️🧰
Hellooo AI Alchemists! 🤖🧪✨
Have you ever wanted to loudly declare your love of Pokémon and then watch the lights in your home change to match the colour of the Pokémon you’re chatting about in realtime?
Well, today’s your lucky day, because that’s exactly what we’re gonna build!
HAPPY DANCE! (no Jigglypuff, not you we need them awake for this).
In this video, we have a Snorlax lamp made out of a cardboard box. When I mention a Pokémon’s name, the lamp changes to match the colour of the Pokémon.
YAY! 🎤 + 💡 + 🌈
By the end of this AI deep dive, you’ll have the following magical ✨shiny✨ new skills to add to your Pokédex of AI and IOT tricks.
Reverse engineer Low Energy Bluetooth (BLE) devices so you can create your own “remote control” for their actions (in this case, colour changing lights💡).
Use OpenAI’s realtime API to trigger smart light actions while you are chatting to it via your laptop’s mic.
You’ll be able to say stuff like:
“My favourite Pokémon is Pikachu”, and your lights will turn yellow. 💛
“I wonder if Jigglypuff knows rap, just to mix things up a little” will turn the lights pink. 🩷
“Change the colour of the light to red said Bulbasaur” will turn the light green. 💚
Are you ready!??
Let’s get building! 🤿
— Becca 💖
If you’d like to see more frequent updates, connect with me on LinkedIn 🥰

Before you start
Before you can build your own AI-powered Siri/Alexa to control your lights, or other smart devices in your home. You first need to know how to interact with your devices through code.
Last weeks deep dive was all about how to reverse engineer your bluetooth low-energy smart devices so that you can build your own remote script to control them. Check it out here 👇

If you just want to learn how to setup a script that lets you trigger code behaviours during a conversation with an AI model, then this AI deep dive will teach you that too. Just swap out the light control code with your own custom methods.
You need:
🎮 A function that can change the colour of your light/s, OR
🎮 Your own custom code behaviour that you want to call during a conversation.
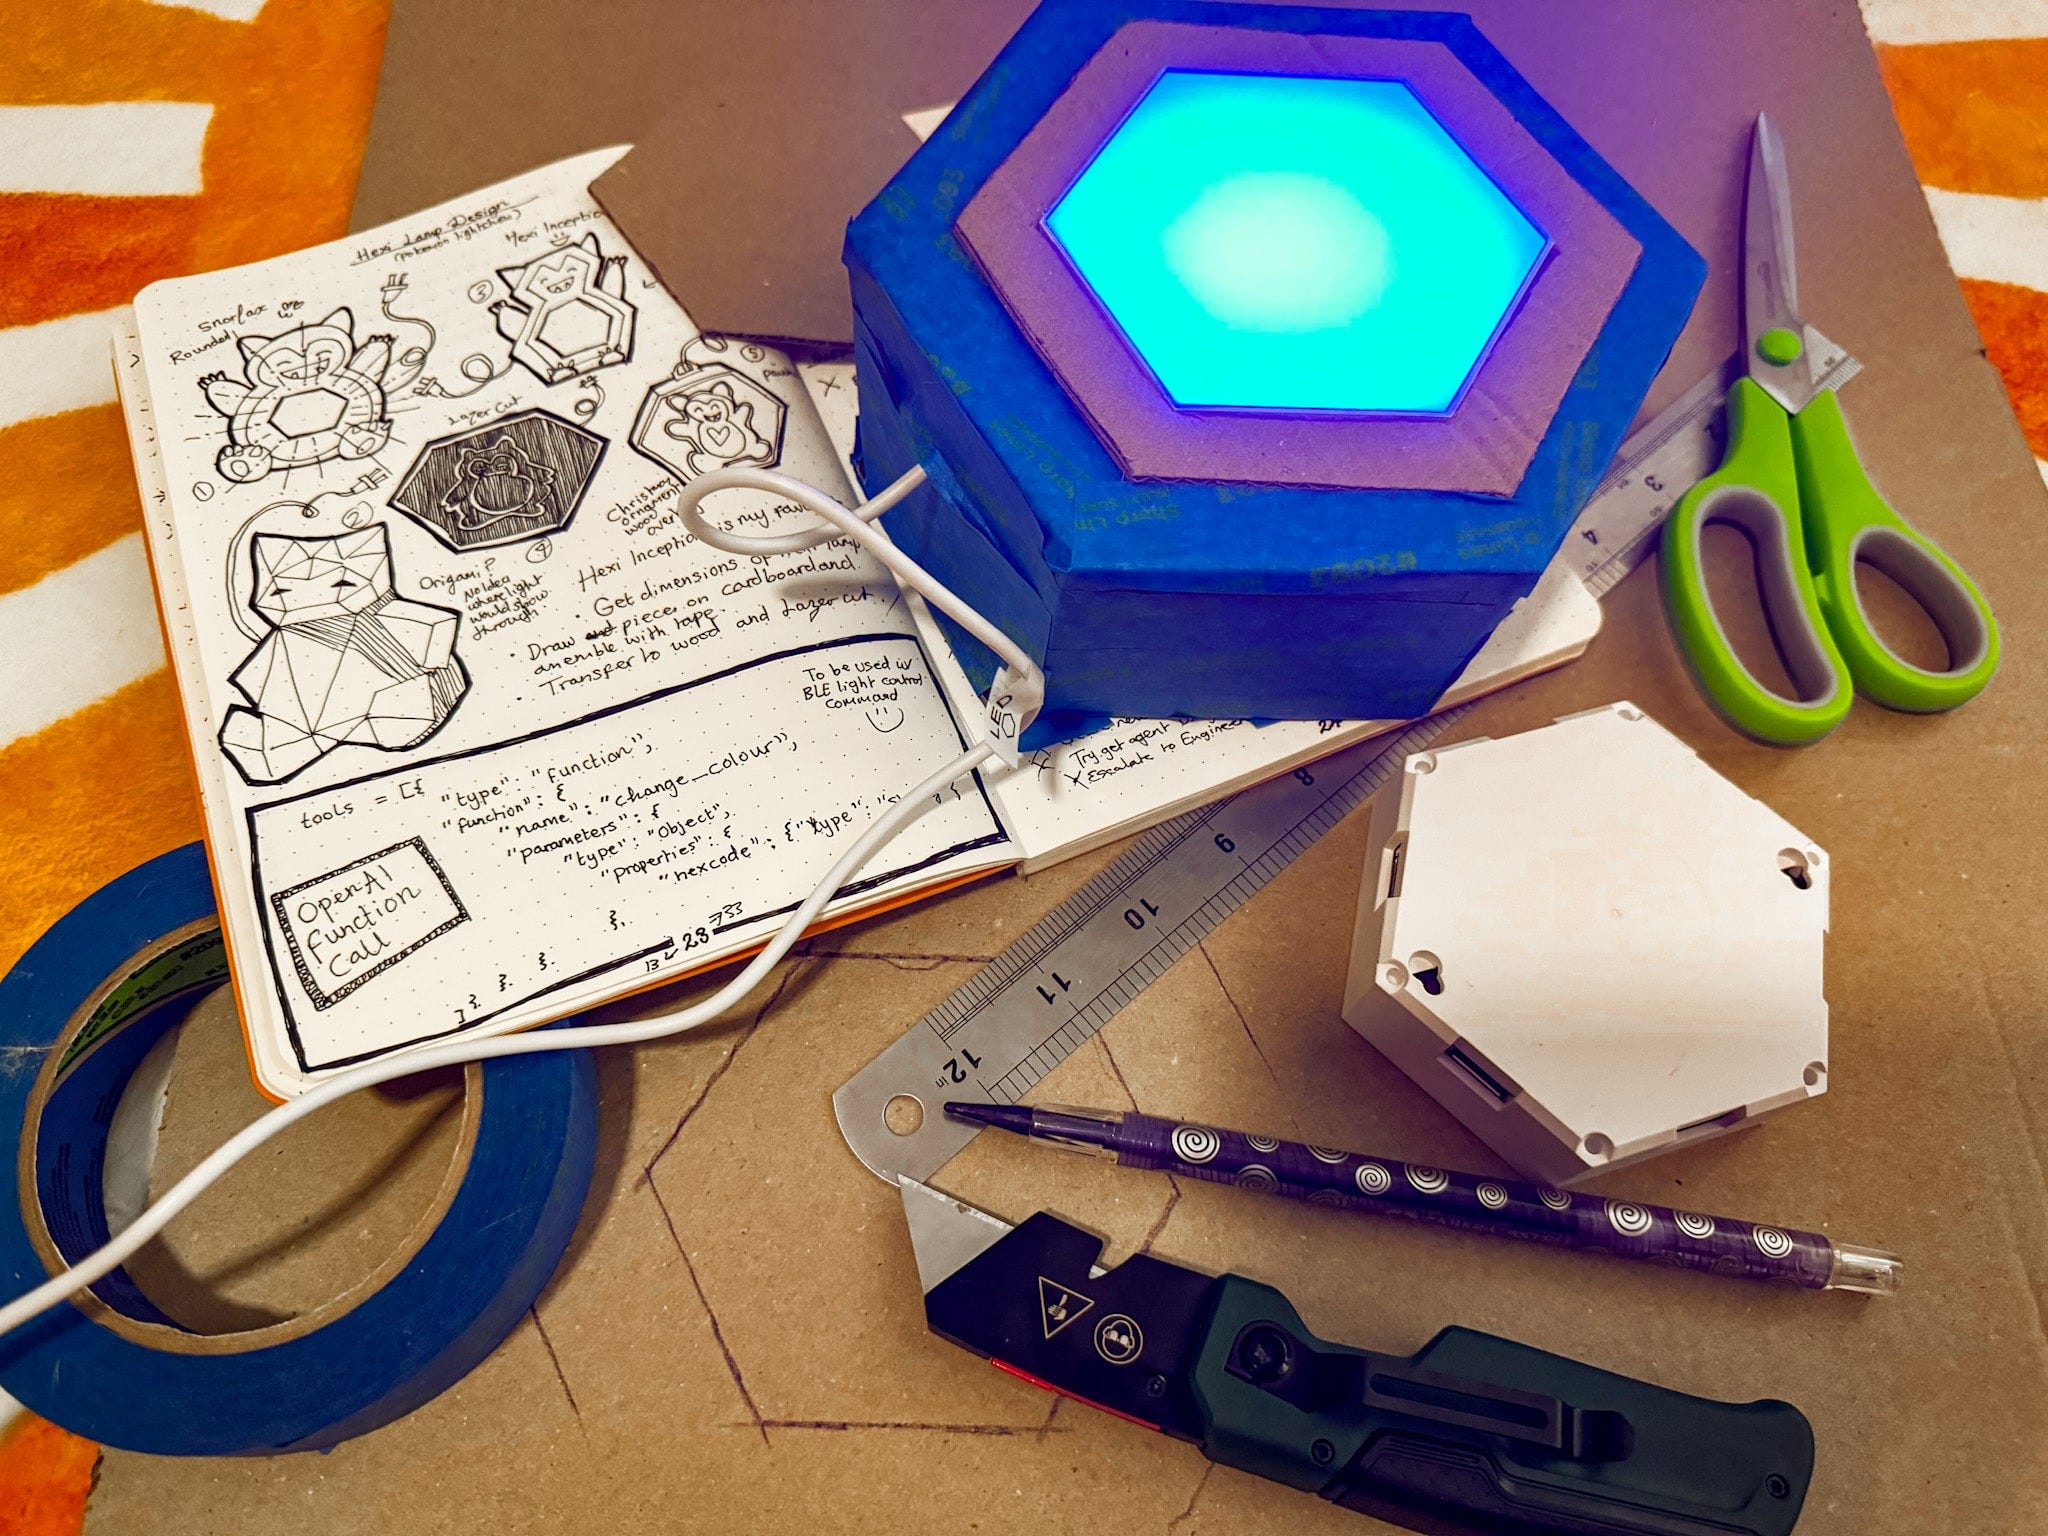
Snorlax lamp - Behind the scenes
Building this Snorlax lamp was a silly amount of joy. I made it out of an cardboard delivery box. The blue colour is from painters tape. I painted the eyes on using some gouache paint.
Build your own AI-Powered Alexa/Siri with OpenAI’s Realtime API
OpenAI’s Realtime API lets you build conversational experiences that feel as natural as talking to a human (almost), and can interact with the real world through custom function calling.
There are two options for using this API: WebRTC, and WebSockets.
WebSockets are a broadly supported API for realtime data transfer, and a great choice for connecting to the OpenAI Realtime API in server-to-server applications. For browser and mobile clients, we recommend connecting via WebRTC - OpenAI Docs.
💝 The full script is at the end of the newsletter. The rest of this deep dive explains how to write it chunk by chunk.
1. Skeleton code
Below is the bear minimum code you need to create a Realtime conversation session via WebSockets. We’ll be growing it like a happy little garden as we progress through this tutorial.
The two key functions are:
on_open: which is called when the WebSocket connection has successfully connected. All it currently does it print that we have successfully connected.
on_message: which is called whenever a message is received back from the Realtime API. All it currently does is print the first event (session creation).
# pip install websocket-client
import os
import json
import websocket
OPENAI_API_KEY = "<YOUR OPENAI API KEY>"
url = "wss://api.openai.com/v1/realtime?model=gpt-4o-realtime-preview-2024-12-17"
headers = [
f"Authorization: Bearer {OPENAI_API_KEY}",
"OpenAI-Beta: realtime=v1"
]
def on_open(ws):
print("Connected to server.")
def on_message(ws, message):
data = json.loads(message)
print("Received event:", json.dumps(data, indent=2))
ws = websocket.WebSocketApp(
url,
header=headers,
on_open=on_open,
on_message=on_message,
)
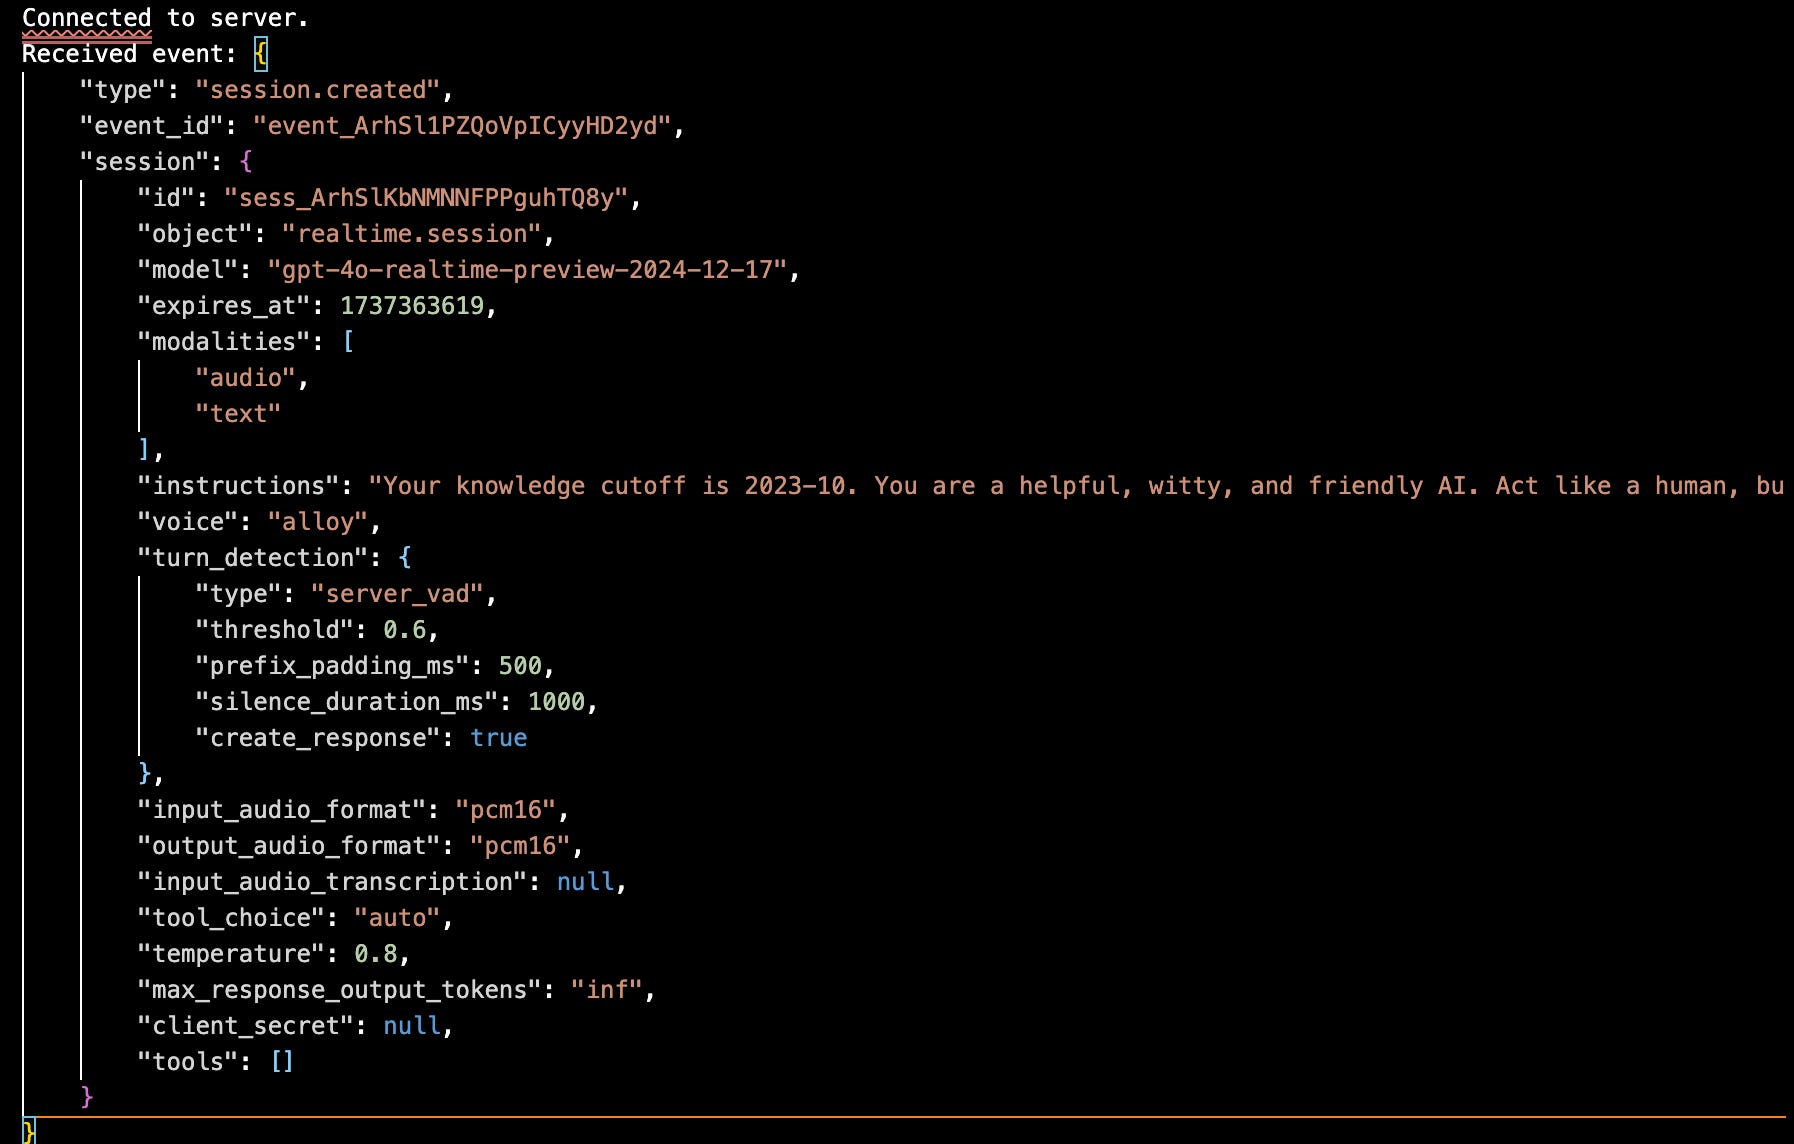
ws.run_forever()When you run this code, you’ll see that a new session has been created. The output will look like the following. It shows that we have connected to server, and that one event has been received — a session creation event.
2. Send a text only event (like a message to ChatGPT)
The first event, creating a new session happens by default when you connect to the Realtime API.
We can also define our own custom events, including sending text only events (similar to how you’d send a chat message to ChatGPT), audio events, function calling events and more. You can see a full list of all the message event types here.
Let’s define and send a text only event first, inside of our on_open method so that our event is sent just after creating a new session.
def on_open(ws):
    print("Connected to server.")

    event = {
        "type": "response.create",
        "response": {
            "modalities": ["text"],
            "instructions": "Please assist the user."
        }
    }
    ws.send(json.dumps(event))
You can delete this event after you’ve tried it out. We won’t be needing it in our speech-to-speech conversation.
3. Send an audio event
Next, we’ll create an event that streams audio to the model.
3.1. Send a single audio chunk event
Of all of the events under the user audio input events, only two event options are relevant to us:
conversation.item.create: Sends a whole audio message at once.
⭐️ input_audio_buffer.append: Streams audio in chunks if you’re sending it gradually.
I decided to choose the input_audio_buffer.append event because I don’t want to have to wait until I’m finished speaking for the model to start processing what I’m saying.
event = {
  "type": "input_audio_buffer.append",
  "audio": base64_chunk
}
ws.send(json.dumps(event))
We have set the type property of the event to the name of our event, and the "audio” property to base64_chunk, which is a way to convert audio to a text-based format that can easily be sent over a WebSocket connection.
However, this only shows how to stream a single audio chunk to the model. We are missing the getting the audio from the microphone, splitting the audio into chunks, looping through the chunks, and converting converting the chunks into base64 format.
Let’s build these out next:
3.2. Capture audio from microphone
The following method captures audio from your microphone.
16-bit format is common for audio because it balances quality and file size. Each sample can represent a value between -32,768 and 32,767, which is enough to capture a wide range of sound intensities.
Mono Channel: Setting the channel to 1 (mono) means that the mic captures a single audio stream. It’s great for speech because we don’t need spatial sound info (like hearing something from the left or right.
Sampling rate: This Defines how many audio samples are taken per second, measured in Hertz (Hz).is the sampling rate, measured in Hertz (Hz). 16,000 Hz is great for human voices (but too low for music).
Input: Means that the program will be listening, not speaking.
Frames per buffer: How many audio frames are collected before making them available for processing.
def capture_audio_from_mic():
    audio = pyaudio.PyAudio()
    stream = audio.open(format=pyaudio.paInt16,
                        channels=1,
                        rate=16000,
                        input=True,
                        frames_per_buffer=1024)
    return audio, stream
3.3. Split audio into chunks
This method splits the audio into chunks. It takes in the stream (produced from capture_audio_from_mic function), and splits them into chunks of 1024 audio frames until there is no more audio in the stream to process.
def get_audio_chunks(stream, chunk_size=1024):
    while True:
        data = stream.read(chunk_size)
        yield data
3.4. Convert audio chunks to base64
This method converts each audio chunk into base64 format, which is a way of turning a bytes object like audio or video into a text-based format that can easily be sent over systems that expect text input, like most APIs. The text isn’t a transcript, but a text based representation of the sound.
def convert_chunk_to_base64(chunk):
    return base64.b64encode(chunk).decode('utf-8')
3.5. Send audio chunk events to Realtime API
Next, we put all the pieces together to listen for and stream chunks of audio in base64 format as events to the Realtime API. The microphone in this case continually listens for the duration of the program. It will stop when the program is cancelled, an error is thrown, or if 30 minutes have passed since the audio was produced.
def send_audio_chunks(ws):
    audio, stream = capture_audio_from_mic()
    try:
        for chunk in get_audio_chunks(stream):
            base64_chunk = convert_chunk_to_base64(chunk)
            event = {
                "type": "input_audio_buffer.append",
                "audio": base64_chunk
            }
            ws.send(json.dumps(event))
    except Exception as e:
        print("Error in audio capture:", e)
    finally:
        print("Stopping audio capture...")
        stream.stop_stream()
        stream.close()
        audio.terminate()
3.6. Start a thread to listen & send audio in background
Finally, we need to update the on_open method to start listening to for audio over the microphone.
This method starts a background thread to run the send_audio_chunks method we created in the section above. We used a thread so that we could send audio data via the WebSocket without blocking the main program, so we can receive messages back from the server (Realtime API) while it’s running.
def on_open(ws):
    print("Connected to server.")
    threading.Thread(target=send_audio_chunks, args=(ws,), daemon=True).start()
4. Receive and play audio replies
The first half of our speech-to-speech python script is now working. We can speak into our microphone, send the audio to OpenAI’s realtime API, and get back a text-based response.
Next, we want to play the audio response so that GPT-4o speaks back to us. Let’s take a look at the events associated with the WebSocket Audio Handling lifecycle from OpenAI docs:
Of the audio handling events in OpenAI’s docs, the two we care about are:
response.audio.delta: Returns incremental audio data as it is being generated by the server. We can stream and play these chunks of audio in real-time.
response.audio.done: Signals that the entire audio response has been generated. We can use this to stop streaming audio or handle any cleanup after playback is done.
Below is how to implement both events to play audio responses to the server, and close the stream once the audio has finished playing. You can implement these events right into the on_message method we created earlier when setting up our WebSocket connection. We are essentially saying when we receive a message back from the server, play the audio associated with it.
def on_message(ws, message):
    server_event = json.loads(message)
    event_type = server_event.get("type")

    if event_type == "response.audio.delta":
        if not hasattr(ws, "audio"):
            ws.audio = pyaudio.PyAudio()
            ws.stream = ws.audio.open(format=pyaudio.paInt16, channels=1, rate=24000, output=True)
        audio_chunk = base64.b64decode(server_event["delta"])
        ws.stream.write(audio_chunk)
        return

    if event_type == "response.audio.done":
        if hasattr(ws, "stream"):
            ws.stream.stop_stream()
            ws.stream.close()
            del ws.stream
        if hasattr(ws, "audio"):
            ws.audio.terminate()
            del ws.audio
        return

    print("Received event:", json.dumps(server_event, indent=2))
4. Call your own custom code (function calling)
By this point, you can already have a realtime conversation through your laptops speaker, and hear an audio response. Woo hooo!
Next, we can define our function calling events, so that the Realtime API can call your custom code while in the middle of chatting with you.
4.1. Define your own custom function
Write your own custom function. This one is just a super simple dummy function I wrote to test the function calling.
def change_light_colour(hex_code):
  return f"The light colour has been changed to {hex_code}"
4.2. Define your functions list
The functions list is something you need for any OpenAI model that can do function calling. It explicitly defines what functions are available for the model to call in a format it can understand.
It describes what the function does and what inputs the function/s need, including their type and a helpful description of what can be there.
It also describes which of the inputs are required or not.
functions = [
    {
        "type": "function",
        "name": "change_light_colour",
        "description": "Changes the colour of the light",
        "parameters": {
            "type": "object",
            "properties": {
                "hex_code": {
                    "type": "string",
                    "description": "A colour code in hex format not including the hash symbol"
                }
            },
            "required": ["hex_code"]
        }
    }
]
4.3. Update the on_open method
Next, we need to update the on_open method to include the function list, as well as any extra instructions you want to provide for the conversation as a whole.
You can swap out the session instructions to anything you want. In my version, I said that any time a pokemon is mentioned in a conversation, it should pick a colour that best represents the colour of that pokemon in hex code format, then use that colour to change the light.
def on_open(ws):
    session_update = {
        "type": "session.update",
        "session": {
            "tools": functions,
            "tool_choice": "auto",
            "instructions": "Any time a pokemon is mentioned in a conversation, you should pick a colour that best represents the colour of that pokemon in hex code format, then use that colour to change the light."
        }
    }
    ws.send(json.dumps(session_update))
    threading.Thread(target=send_audio_chunks, args=(ws,), daemon=True).start()
4.3. Update the on_message method
Finally, we need to add a new event type handler for function events. For your own version of this, all you need to change is the name of the function and the arguments it accepts (two lines), and nothing else. All this is doing is saying “if an event is of a function calling type, call the real function with the correct arguments”.
def on_message(ws, message):
    server_event = json.loads(message)
    event_type = server_event.get("type")

    if event_type == "response.function_call":
        function_name = server_event["item"]["name"]
        arguments = json.loads(server_event["item"]["arguments"])

        if function_name == "change_light_colour":
            result = change_light_colour(arguments["hex_code"])
            function_response = {
                "type": "conversation.item.create",
                "item": {
                    "type": "function_call_output",
                    "call_id": server_event["item"]["call_id"],
                    "output": result
                }
            }
            ws.send(json.dumps(function_response))
        return

   ... all of the remaining audio event type code
4. Final code: Have a realtime convo through your laptop mic and speakers
Here is the final Pokémon light changing Siri code. You can run this as it is, and when you mention the name of any Pokémon, it’ll call the function called “change_light_colour”, and output: "The colour of the light has been changed to {hex_code}"
You can replace the function to actually implement your own light changing colour code or any other custom method you’d like.
To run it:
Create a new file on your machine called “pokemon_siri.py” and copy the code below into it.
Create a .env file, and add your OpenAI api key to it.
OPENAI_API_KEY=<YOUR_OPENAI_API_KEY>Use pip to install websocket-client, pyaudio and python-dotenv.
Run the code and start speaking:
python3 pokemon_siri.pyHere’s the full code:
from dotenv import load_dotenv
import websocket
import threading
import pyaudio
import base64
import json
import os

load_dotenv()
OPENAI_API_KEY = os.getenv("OPENAI_API_KEY")

url = "wss://api.openai.com/v1/realtime?model=gpt-4o-realtime-preview-2024-12-17"
headers = [
    f"Authorization: Bearer {OPENAI_API_KEY}",
    "OpenAI-Beta: realtime=v1"
]

def change_light_colour(hex_code):
    return f"The colour of the light has been changed to {hex_code}"

functions = [
    {
        "type": "function",
        "name": "change_light_colour",
        "description": "Changes the colour of the light",
        "parameters": {
            "type": "object",
            "properties": {
                "hex_code": {
                    "type": "string",
                    "description": "A colour code in hex format not including the hash symbol"
                }
            },
            "required": ["hex_code"]
        }
    }
]

def capture_audio_from_mic():
    audio = pyaudio.PyAudio()
    stream = audio.open(format=pyaudio.paInt16,
                        channels=1,
                        rate=16000,
                        input=True,
                        frames_per_buffer=1024)
    return audio, stream

def get_audio_chunks(stream, chunk_size=1024):
    while True:
        data = stream.read(chunk_size)
        yield data

def convert_chunk_to_base64(chunk):
    return base64.b64encode(chunk).decode('utf-8')

def send_audio_chunks(ws):
    audio, stream = capture_audio_from_mic()
    try:
        for chunk in get_audio_chunks(stream):
            base64_chunk = convert_chunk_to_base64(chunk)
            event = {
                "type": "input_audio_buffer.append",
                "audio": base64_chunk
            }
            ws.send(json.dumps(event))
    except Exception as e:
        print("Error in audio capture:", e)
    finally:
        stream.stop_stream()
        stream.close()
        audio.terminate()

def on_open(ws):
    session_update = {
        "type": "session.update",
        "session": {
            "tools": functions,
            "tool_choice": "auto",
            "instructions": "Any time a pokemon is mentioned in a conversation, you should pick a colour that best represents the colour of that pokemon in hex code format, then use that colour to change the light."
        }
    }
    ws.send(json.dumps(session_update))
    threading.Thread(target=send_audio_chunks, args=(ws,), daemon=True).start()

def on_message(ws, message):
    server_event = json.loads(message)
    event_type = server_event.get("type")

    if event_type == "response.function_call":
        function_name = server_event["item"]["name"]
        arguments = json.loads(server_event["item"]["arguments"])

        if function_name == "change_light_colour":
            result = change_light_colour(arguments["hex_code"])
            function_response = {
                "type": "conversation.item.create",
                "item": {
                    "type": "function_call_output",
                    "call_id": server_event["item"]["call_id"],
                    "output": result
                }
            }
            ws.send(json.dumps(function_response))
        return

    if event_type == "response.audio.delta":
        if not hasattr(ws, "audio"):
            ws.audio = pyaudio.PyAudio()
            ws.stream = ws.audio.open(format=pyaudio.paInt16, channels=1, rate=24000, output=True)
        audio_chunk = base64.b64decode(server_event["delta"])
        ws.stream.write(audio_chunk)
        return

    if event_type == "response.audio.done":
        if hasattr(ws, "stream"):
            ws.stream.stop_stream()
            ws.stream.close()
            del ws.stream
        if hasattr(ws, "audio"):
            ws.audio.terminate()
            del ws.audio
        return

    print("Received event:", json.dumps(server_event, indent=2))

ws = websocket.WebSocketApp(
    url,
    header=headers,
    on_open=on_open,
    on_message=on_message
)

ws.run_forever()
If you build your own AI-powered Alexa/Siri using this guide. Please tell me all about it, I LOVE it when you do.
Until next time,
Stay sparkly 💖
If you’d like to see more frequent updates, connect with me on LinkedIn 🥰
Moar GenAI Projects! 🤖🧪✨
🎁 Here are some more projects to check out if you loved this one!
