
Reverse Engineer BLE Smart Lights
Learn how to reverse engineer BLE Smart Devices (like colour changing lights), so you can write your one script to control them all, even lights from multiple manufacturers.

Forwarded this email? Subscribe here for more ✨
Welcome to the 13th edition of the 100 GenAI MVPs newsletter, a journey all about shipping 100 happy and helpful GenAI solutions, and how to build them! 🚀👩💻✨ Together, we built a Robot Panda you can chat with (🏆 award winner), a video clip extractor (Men In Black edition), and many more!
Hellooo AI Alchemists! 🤖🧪✨
Learning how to reverse engineer bluetooth (or WiFi) powered smart lights is a really useful project, especially if you’re interested in smart home automation.
At the moment, when you buy smart lights from different manufactures, you have to download an app for each of them to be able to control them. No one wants to open three apps just to turn the lights on. Ick.
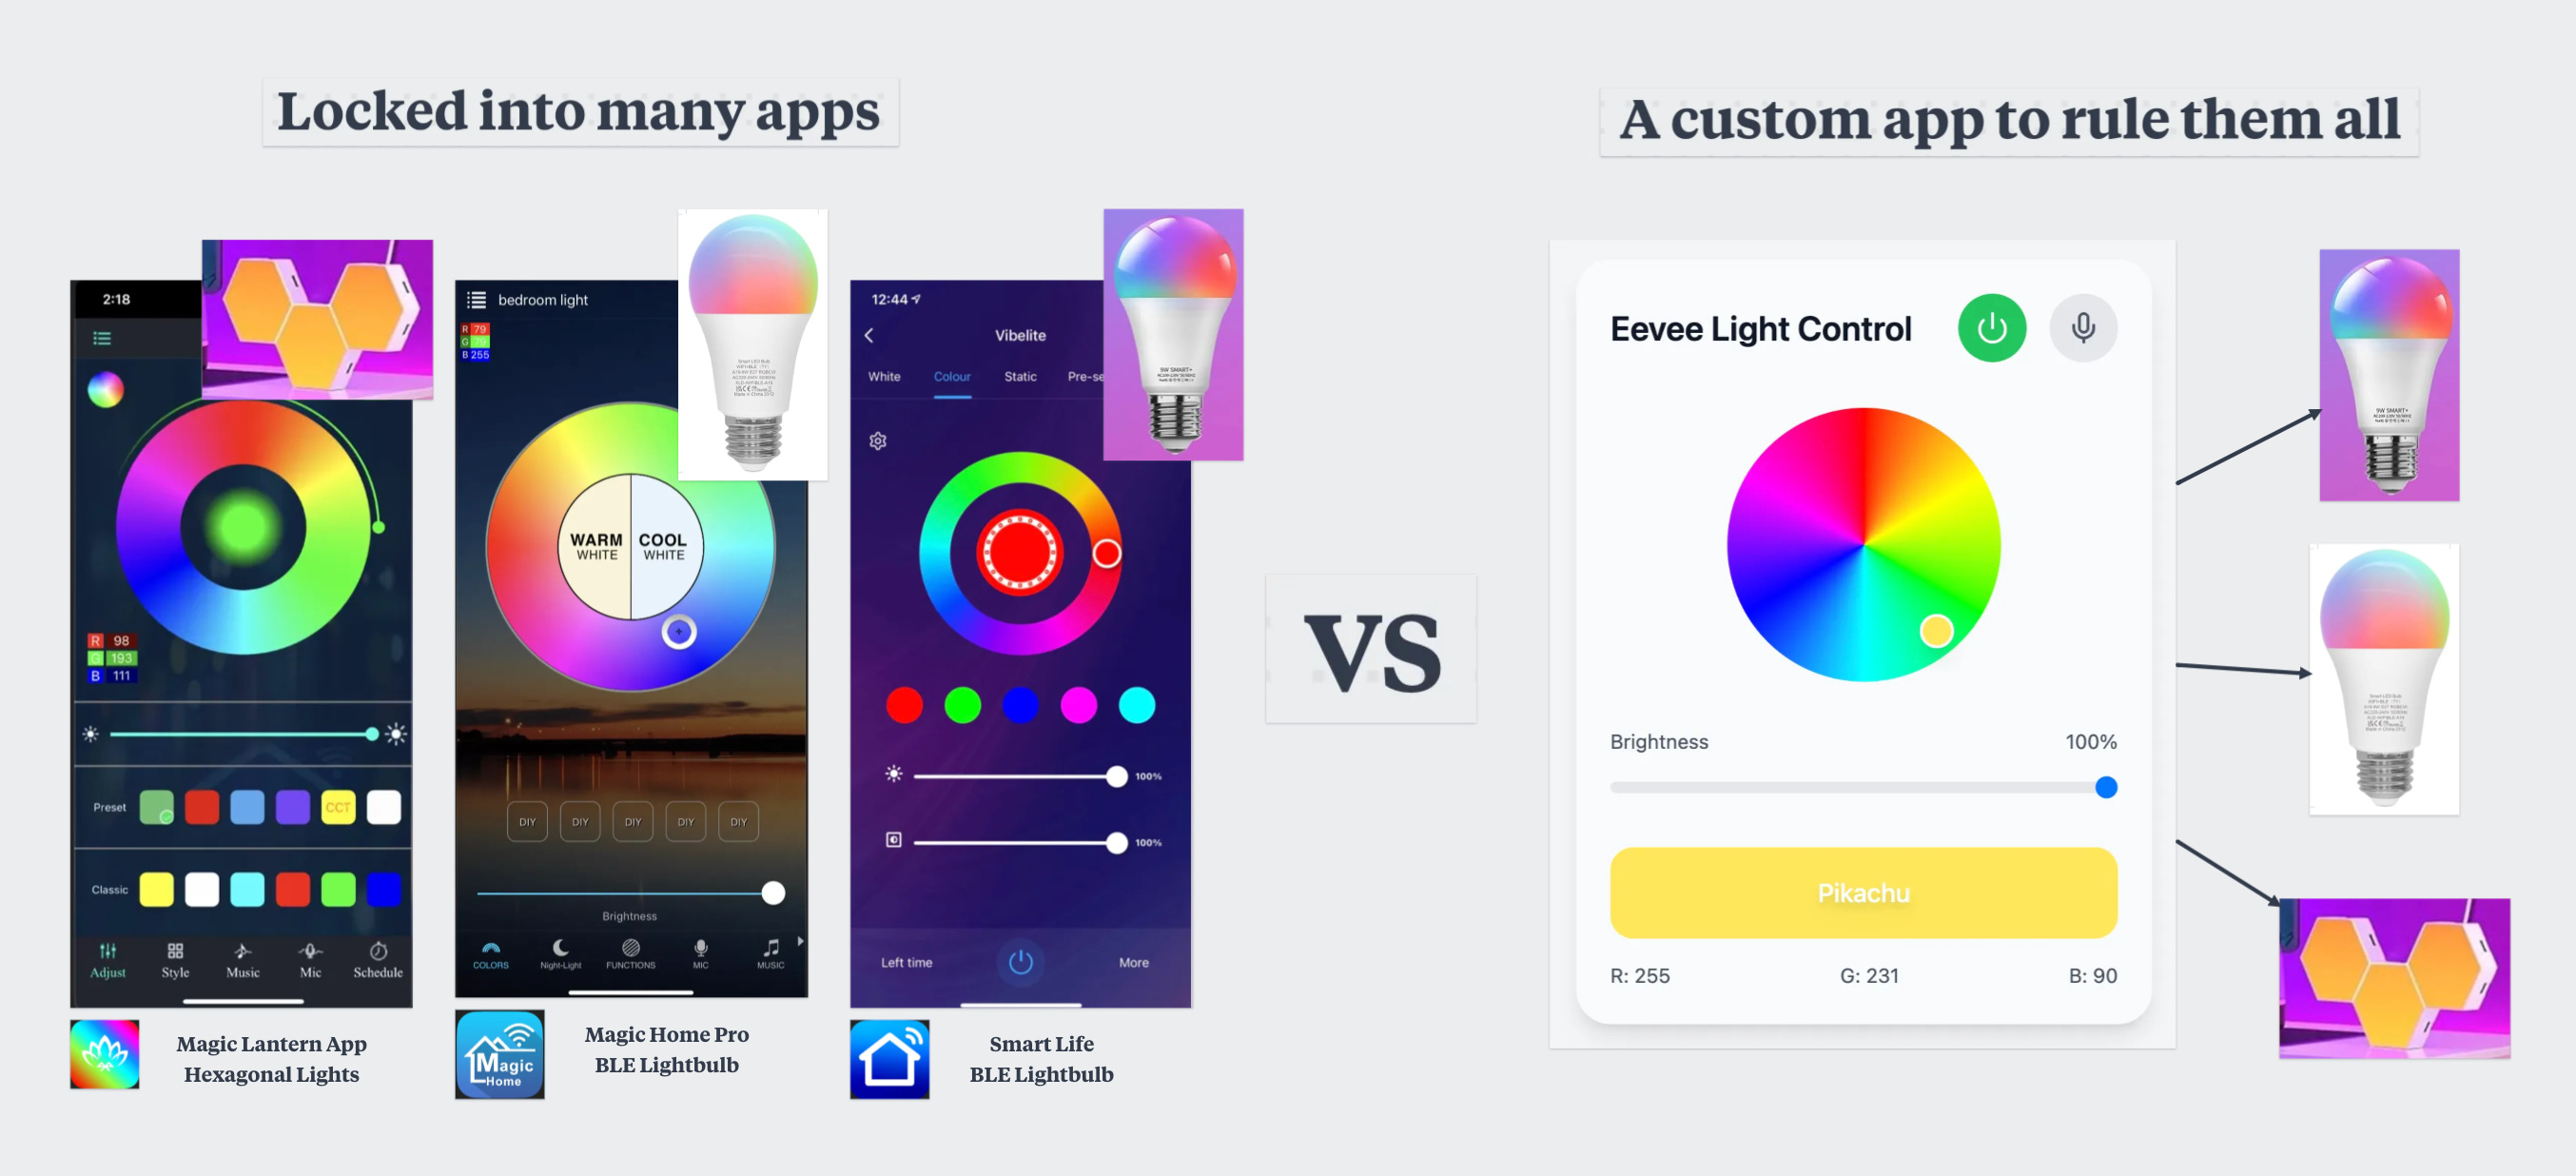
In this post, you’ll learn how to Reverse engineer Low Energy Bluetooth (BLE) devices so you can create your own “remote control” for their actions (in this case, colour changing lights💡).
This isn’t an AI deep dive, but it’ll be used as a foundation for near future AI & BLE device projects. For example:
In the next post, I’ll show you how to build your own AI-powered Alexa/Siri to control your smart lights!
Are you ready!??
Let’s get building! 🤿
— Becca 💖
If you’d like to see more frequent updates, connect with me on LinkedIn 🥰

How to reverse engineer a bluetooth smart light?
Reverse engineering a bluetooth smart light involves interacting with the light using the app that comes with it, capturing the data that is sent between them over bluetooth, unpacking that data, then sending the commands to your light and observing what happens when you do. Then you can write a script to automate it.
It isn’t always possible to do this if security has been taken seriously. Luckily for us (and pretty sketchily), most cheaper BLE devices don’t obfuscate their packet data.
For example, I was able to send colour values to Philips Hue Lights successfully, but could not reverse engineer the values that changed them (on and off and brightness was fine tho).
What you need
You’ll need the following apps and tools (or their equivalent) to do this:
A Bluetooth Low-Energy (BLE) Smart Light.
Android phone (or bluetooth sniffer dongle) - Capture BLE data.
A cable to connect phone to computer.
rNF Connect App (Android) - Send commands to your device.
Wireshark App (Computer) - Unpack data sent between phone and light.
Core Concepts
Bluetooth Low Energy (BLE): Most bluetooth-powered smart devices you’ll find in your home like lights, appliances, toys, gadgets and fitness trackers etc use the BLE communication protocol. It’s designed for sending small amounts of data without consuming too much power.
Generic Attribute Profile (GATT) Framework: Used in BLE communication. It defines how data is sent and accessed between devices (e.g. a light and an app).
Services: Services group together related device characteristics, pretty much like a folder. Often services correspond to a primary feature or capability of a device. Each service has it’s own Universally Unique Identifier (UUID). Standard UUIDs exist for common device services, but you can also create your own.
Characteristics: Characteristics are individual items of state data. They have a type, a value (e.g. colour value for a light that changes colour) and a set of properties which indicate how the data may be used (read, write, write and respond, notify, indicate).
Descriptors: Extra info about the characteristic, like its format, unit of measurement or range of possible values etc. A characteristic can have 0 or many descriptors.
If you reeeaallllly want to deep dive, here’s the full Bluetooth Low Energy Primer white paper from Bluetooth.
Step 1: Sniff out the Bluetooth packets
We need to capture the raw data that is sent between our light and our phone over bluetooth. We can do this with a bluetooth sniffer.
What are Bluetooth sniffers?
A Bluetooth Sniffer captures Bluetooth communication between devices. It acts as a “man-in-the-middle” observer, letting you see the raw data packets as they are exchanged between your devices in realtime.
Unfortunately, there isn’t an easy way to do this on IOS devices, because Apple apps are sandboxed and we can’t easily eavesdrop on data sent over Bluetooth (for security reasons). There are options, like PacketLogger, or hardware dongles like the NRF52840 dongle that you can plug into your laptop.
It’s much easier to do on Android.
Sniff Bluetooth packets on Android
Android has a diagnostic feature called Bluetooth HCI snoop logging, which lets you capture and save the raw data packets sent over bluetooth. It’s stored in a file called “btsnoop_hci.log”).
1. Enable Bluetooth HCI Snoop logging on Android
These are the steps for enabling bluetooth snoop logging:
Go to your Android phone’s Settings.
Click on “About phone” and find the “Build number”.
Tap the Build number 7 times to enable Developer Options.
Then go back to settings and click on “Developer Options”.
Scroll down and enable Bluetooth HCI snoop log.
Scroll down and enable “USB debugging” too.
Turn Bluetooth off and on again.
You need to turn Bluetooth HCI Snoop logging off when you’re not using it to test actions. It’ll start a brand new log each time you turn it on.
2. Perform bluetooth actions
Open the app that comes with your colour changing smart light, and start performing actions in it. It’ll be easier to reverse engineer the commands later by grouping same actions together:
Turn your light on and off 10-20 times.
Increment your brightness all the way down and all the way back up again.
Change the colour a gazillion times. It also helps to group your colour changes by hue too — like changing it to a few different reds, then oranges, then yellows and so on around the colour wheel.
Turn your light on and off 10-20 times again (for the symmetry).
3. Retrieve the HCI snoop log file
To get the file on from an Android phone, first connect your phone to your computer. Then:
Install the Android Platform tools onto your computer. I used Homebrew on Mac:
brew install android-platform-toolsCheck that adb is installed. ADB is the Android Debug Bridge command line tool. You’ll use it to grab the bluetooth log from your phone.
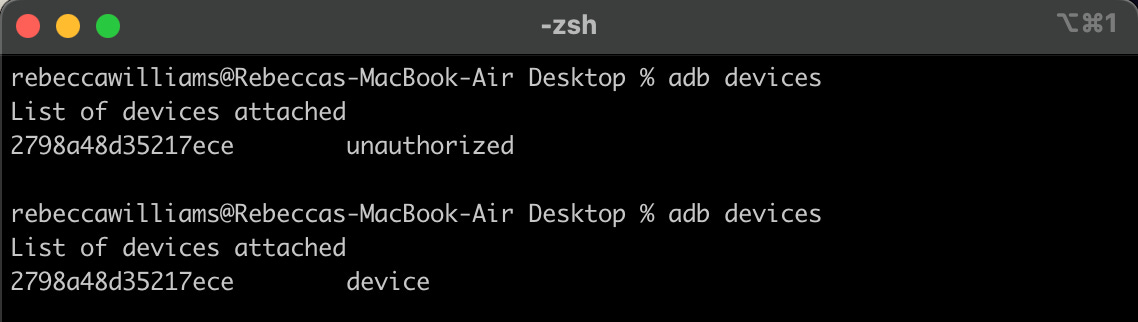
adb --versionUse abd to list connected devices to check it has been connected correctly.
adb devicesAfter running this command, you should see a unique identifier followed by “device”. If you see a unique identifier followed by “unauthorized”, it means you need to unlock your phone and authorise your computer. Here’s what both cases look like:
Generate a bug report via your command line so you can access your bluetooth log (replace bugreport.zip with the filename you want):
adb bugreport bugreport.zipExtract the zip file, then navigate to the FS/data/log/bt directory. You should see the btsnoop_hci.log file there:
cd bugreport/FS/data/log/bt && lsThe contents of the btsnoop_hci.log file is in binary format, so we’ll need another tool to unpack and read the contents.
Step 2: Unpack the Packets with Wireshark
Wireshark is a network protocol analyser. You can used it to read the data exchanged between devices over various protocols, including BLE.
1. Install WireShark
Download it from the Wireshark website. I used Homebrew on Mac to install it:
brew install --cask wireshark2. Open the file in Wireshark
Open the btsnoop_hci.log file in Wireshark. File > Open > search for the log file > open.
When you first open it, you’ll see a list of all of the packets sent over bluetooth while your Bluetooth HCI snoop logging was enabled, in order of oldest to newest:

3. Filter the packets to write commands sent from phone to device
Next, we want to narrow down the packets to just those where we are sending a write command from our phone light control app to our smart light. We can do this by pasting the following filter into the “apply a filter” bar at the top of the Wireshark screen:
btatt.opcode == 0x12btatt - Bluetooth Attribute Protocol (ATT).
.opcode - Specifies the type of operation being performed. For example, reading data, writing data, or sending notifications.
0x12 - Is the hexadecimal value for the Write Request operation. A Write Request is a command sent by the client (your phone) to the server (the smart light) to write a value to a specific GATT characteristic.
4. Add custom columns and export packet data as CSV
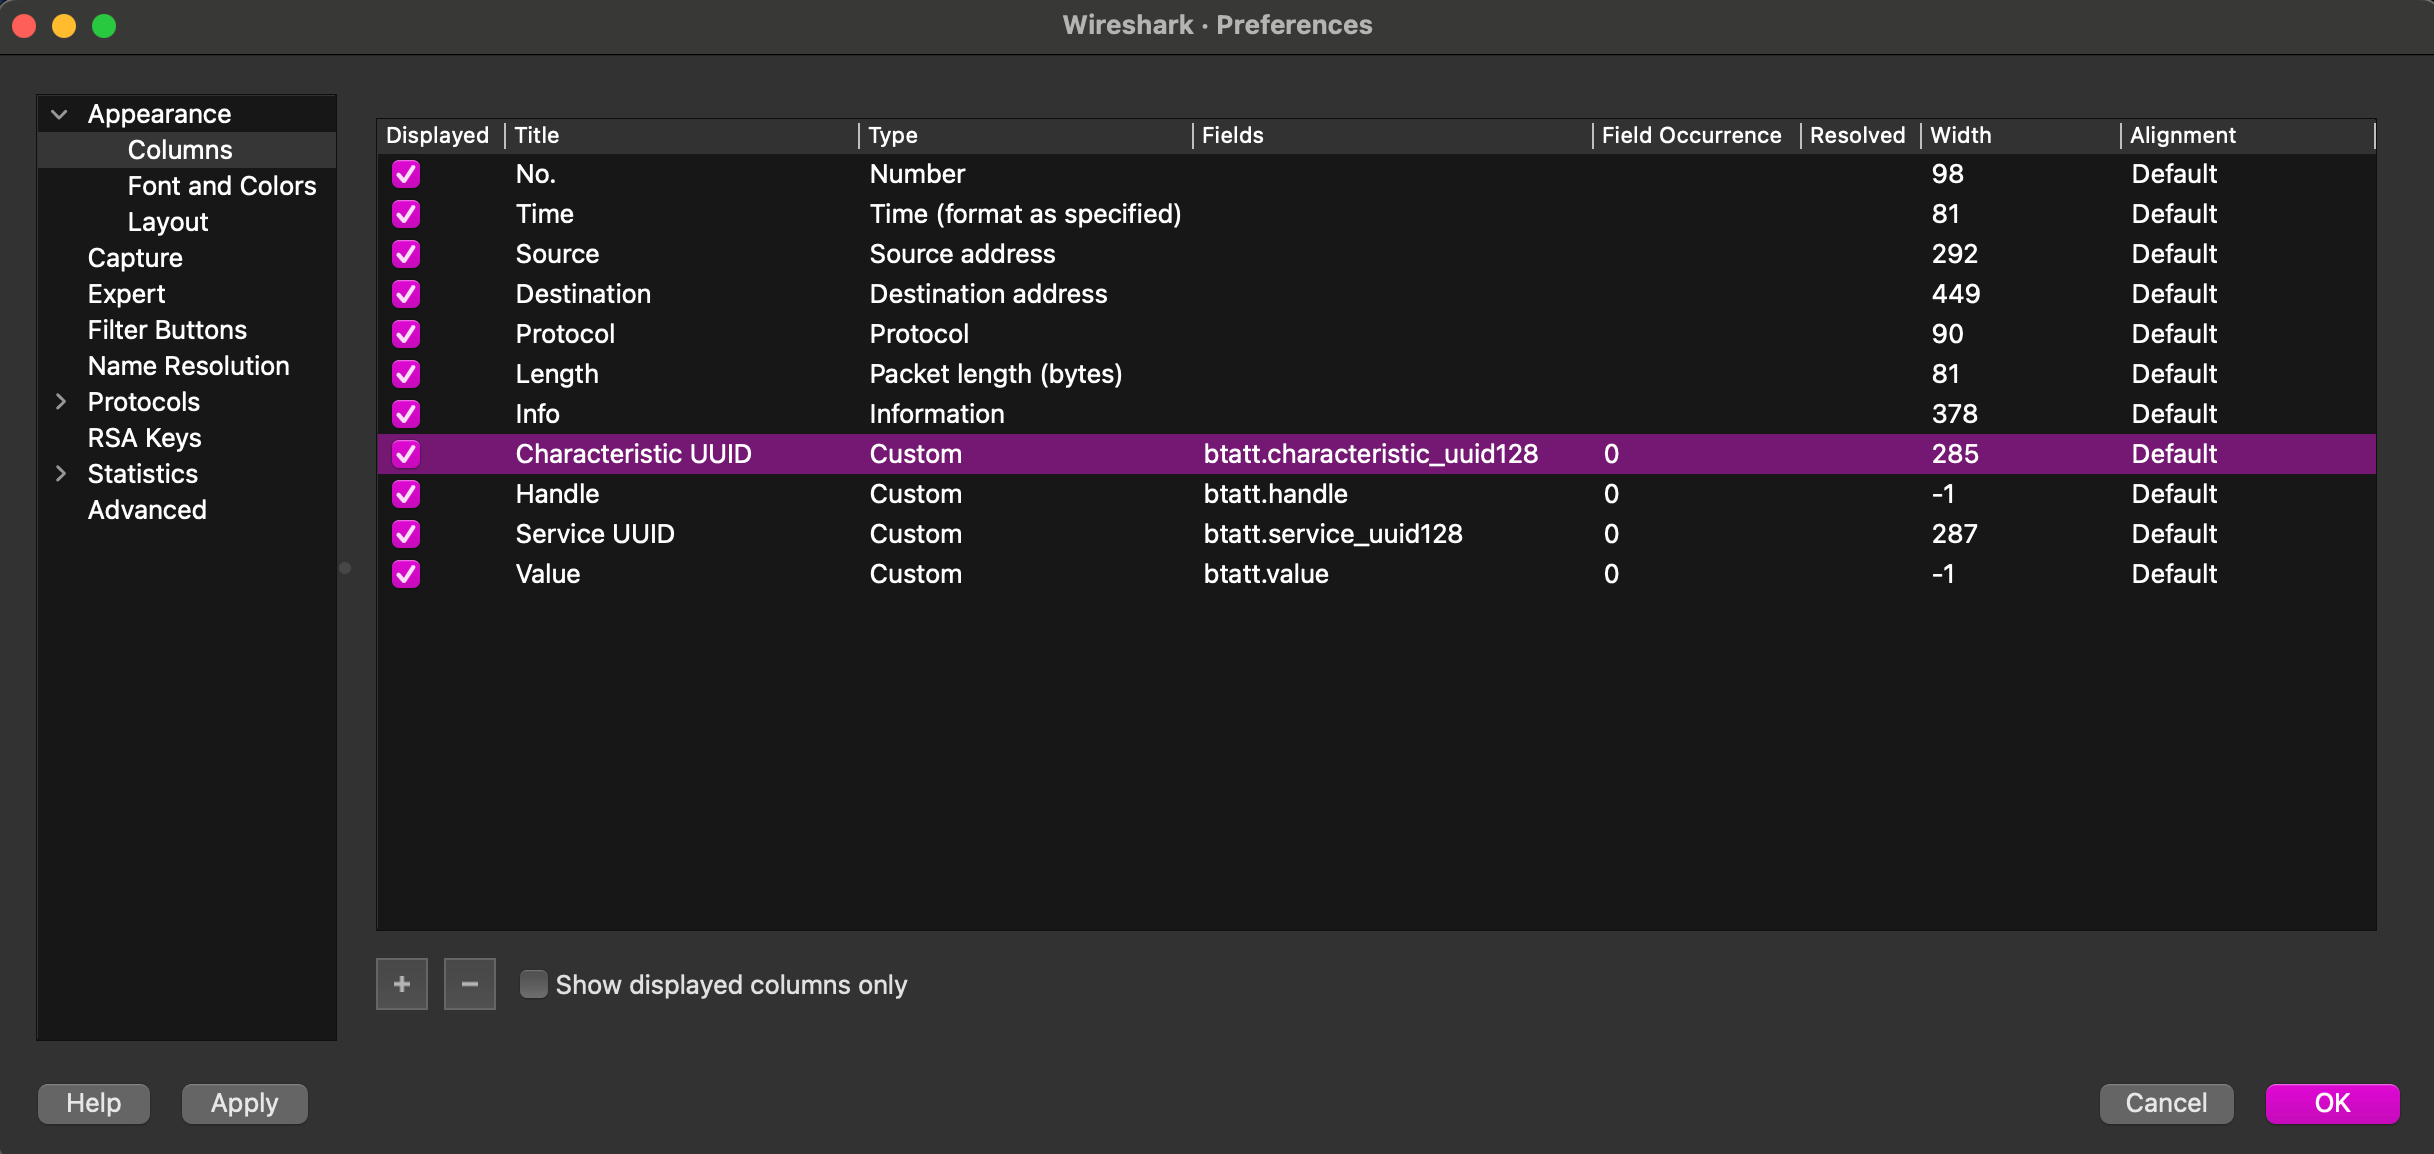
The key information we need to extract are the service and characteristic UUIDs, along with the values that were written to them. When you click on a packet, these are displayed under the bottom left panel, under Bluetooth Attribute protocol.
To add them to your main table, click on “Wireshark” in the toolbar > “preferences” > “Columns”. Then click the “+” button, and choose the “Custom” Type for the field. The values you need are shown in the Fields column, e.g. “btatt.characteristic_uuid128” for the characteristic ID.
Note: If you don’t see the Characteristics and Services UUIDs after pressing “OK”, you’ll need to open your bluetooth settings on your phone, forget device, then re-run the bluetooth packet snooping steps because they’ll have been cached.
Then export this data as a CSV by clicking “File” > “Export Packet Dissections” > “As CSV”. This will make it easier to explore the data.
Step 3: Find out what the values do
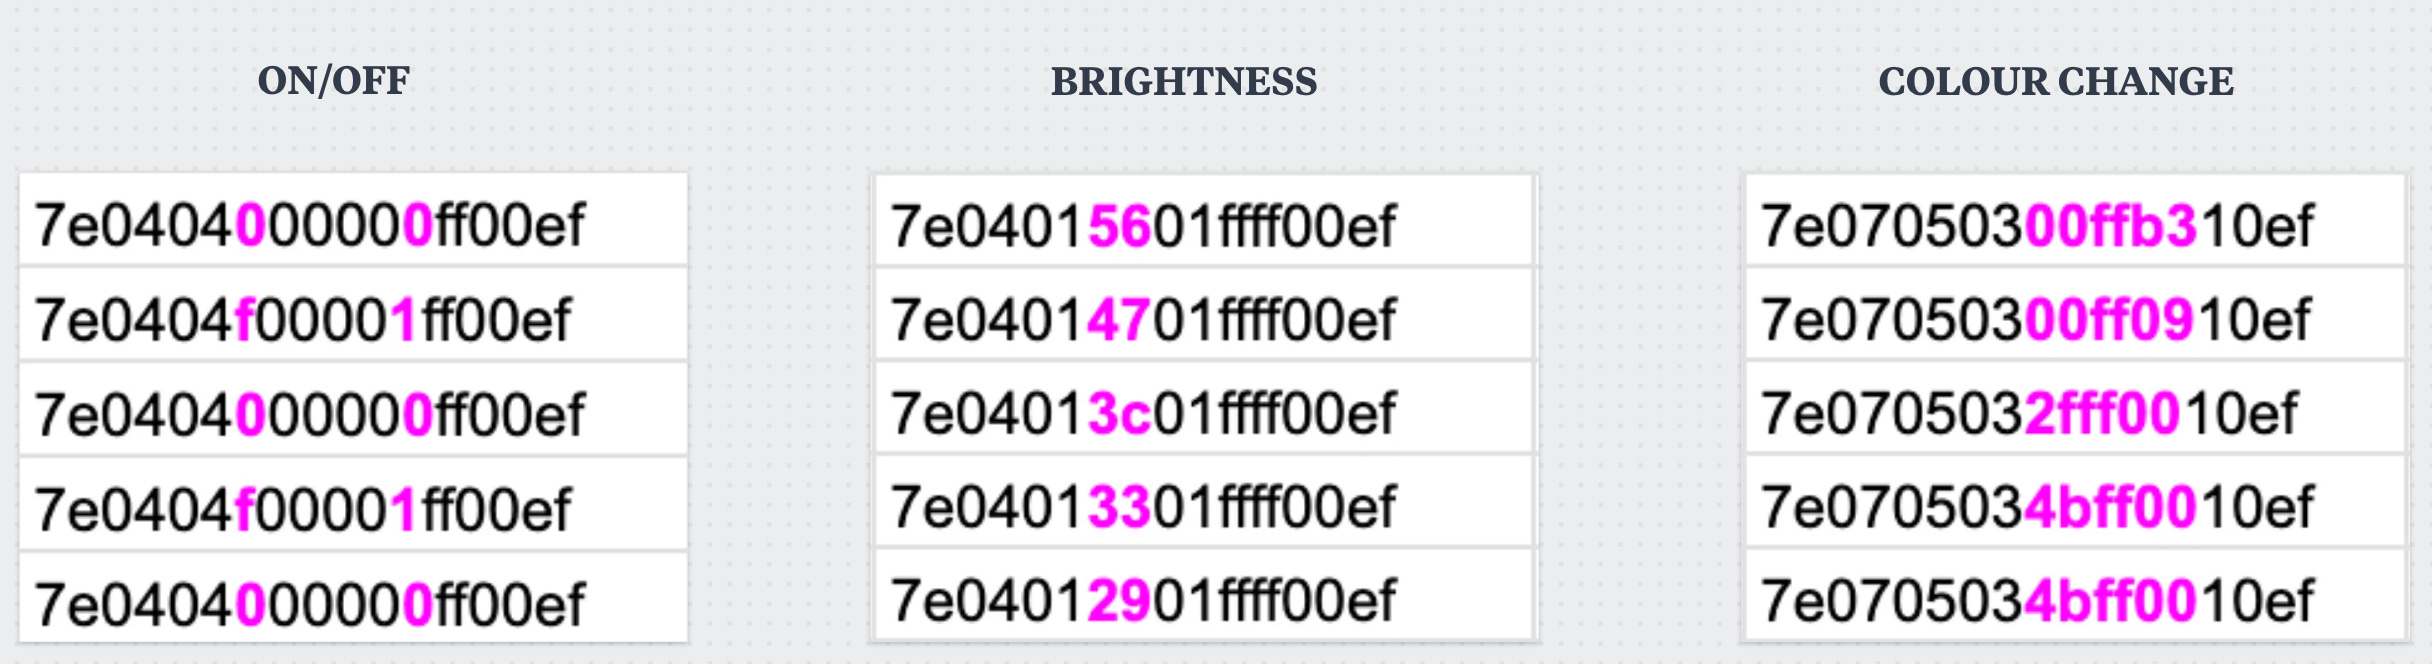
The values will all be in hexadecimal format, where each digit can be a number from 0-9, or a letter from a-f (11-15). If you’ve ever seen a colour hex code, this will feel more familiar to you.
1. Spot patterns
The first thing to do with packet values, is try and spot the difference. Look at what stays the same, and what changes. For example, the parts that change have been highlighted in pink below.
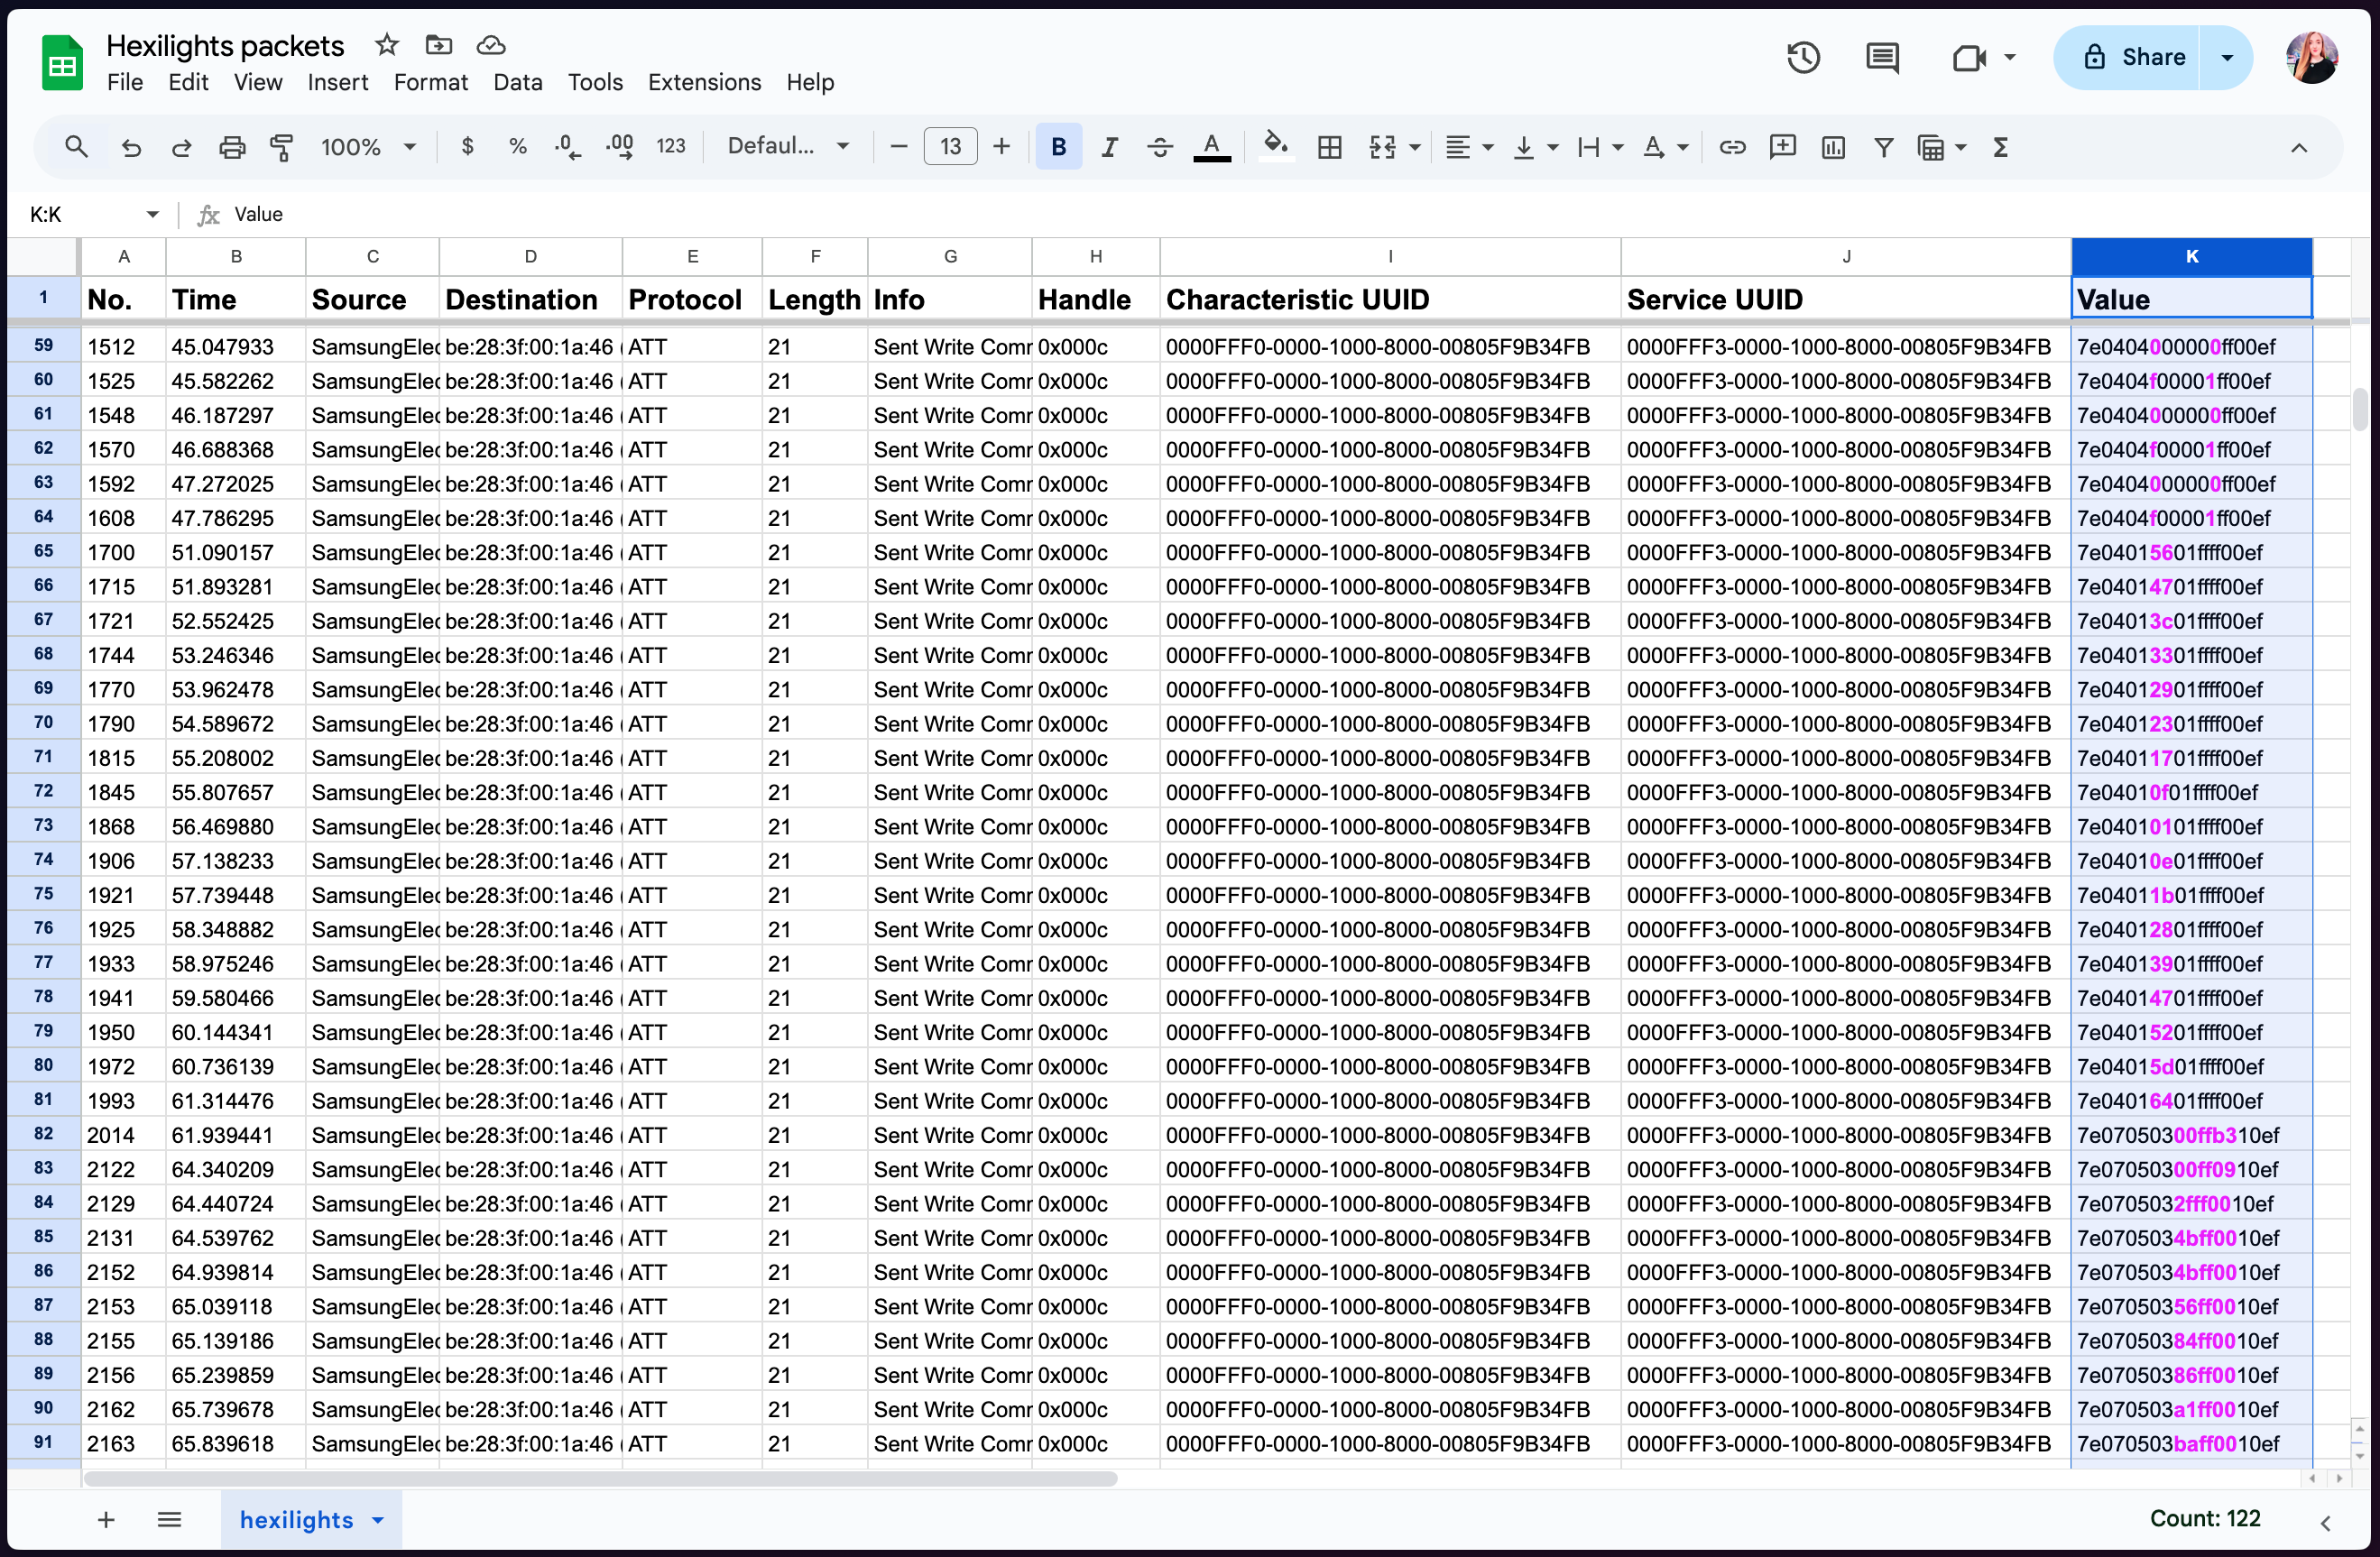
As you can see, the patterns are much easier to spot when you group all of the device actions you perform when capturing bluetooth packets — e.g. on/off, then brightness, then colour changes.
While we might be confident that this is what the values are doing, we won’t know for sure until we write them to our device and see what happens. Let’s do that next.
2. Write the values to your device and see what happens
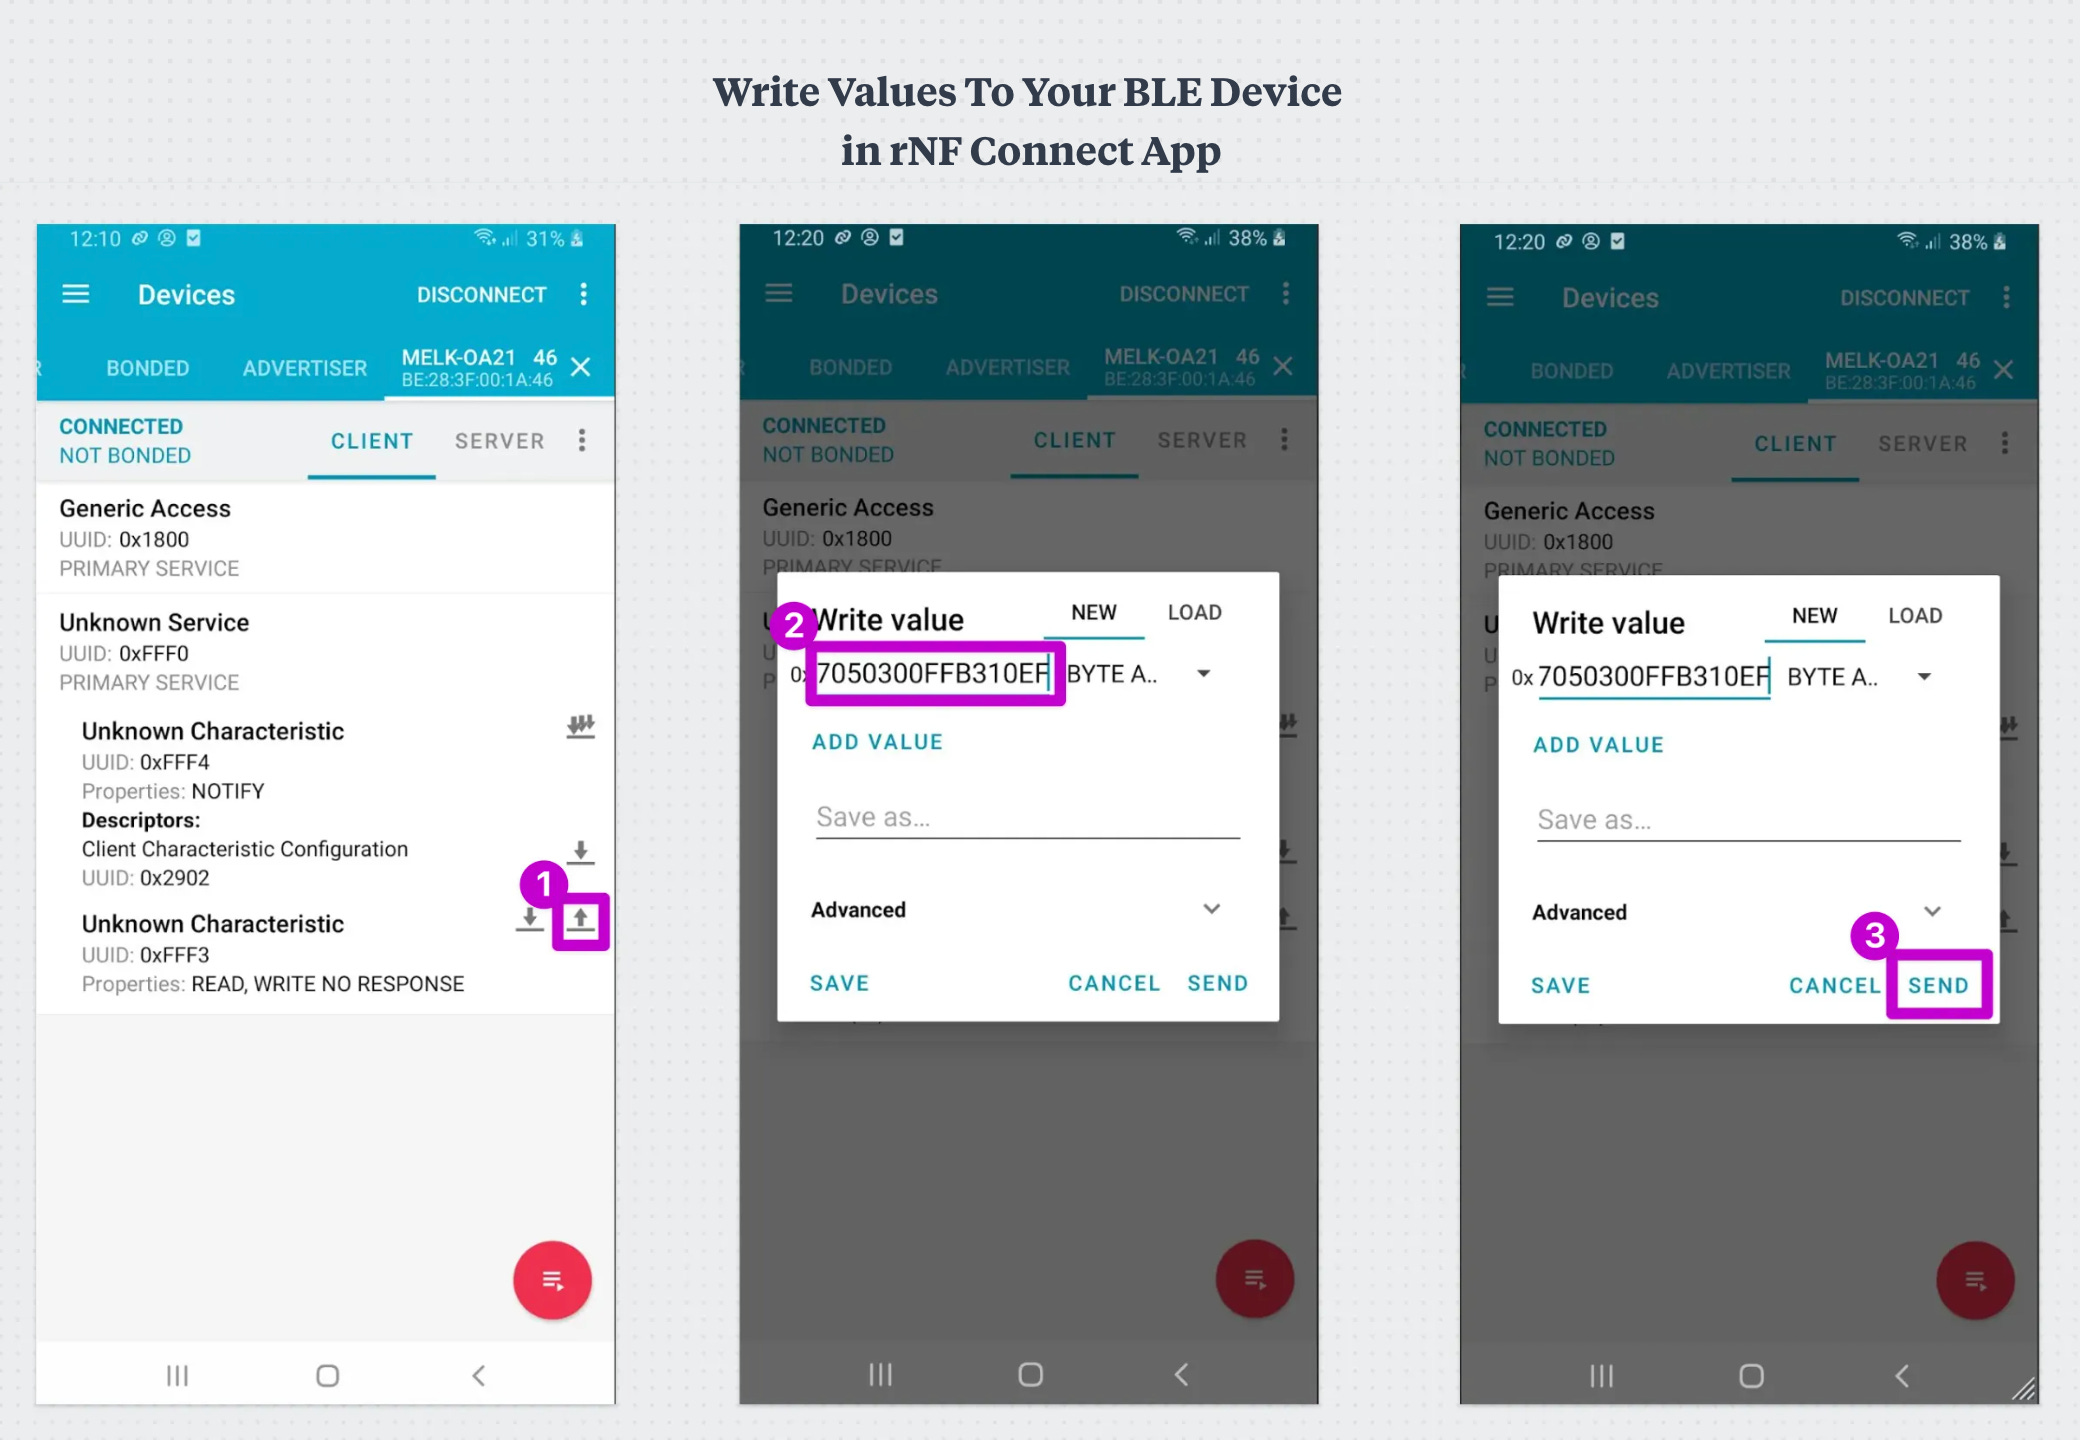
Finally, it’s time to start writing commands to our light and see what it does. You could write a script to do this (I’ll show you how later). But for the discovery phase it’s easiest to use the rNF Connect App.
The rNF Connect app lets you interact with BLE devices via their services and characteristics, like reading and writing data or monitoring notifications.
Write data to your light via rNF Connect App
Open the app and navigate to the “Scanner” tab.
Connect to your BLE smart light.
Navigate to the services tab (list icon).
Find the characteristic for an action you want to test, using the Service then Characteristic UUIDs that you exported to a CSV file earlier.
Click on the Up arrow next to that Characteristic.
Enter the value you want to test. It will be the full hexadecimal value from your spreadsheet. Click “Send”.
Observe what happens.
See if there are any changes in the physical light.
You can use the app that comes with the light to confirm specific values like a brightness percentage or colour codes.
Write what happens in your spreadsheet next to the relevant characteristic for your future self.
By plugging in the value “7e0705034bff0010ef” to the right characteristic, I learned that it changed the colour of my light to blue.
Step 4: Write a script to interact with your light
Now we’ve worked out what some or all the values all do when sent to our device, we can start writing a script to automate those actions.
Here is a breakdown of a python script for connecting to one device and writing values for different behaviours:
Imports:
import asyncio
from bleak import BleakScanner, BleakClient
import subprocess
Turn bluetooth on:
def turn_bluetooth_on():
    result = subprocess.run(["blueutil", "--power"], capture_output=True, text=True)
    if result.returncode == 0 and result.stdout.strip() == "0":
        subprocess.run(["blueutil", "--power", "1"], capture_output=True, text=True)
Scan for bluetooth devices:
async def scan_ble_devices():
    return await BleakScanner.discover()
Connect to your device:
async def connect_to_light(devices):
    hexilights_address = "D8A41495-36BF-55D6-2117-6EAF0DD27995"
    matched_device = next((d for d in devices if d.address == hexilights_address), None)

    if matched_device:
        async with BleakClient(matched_device.address) as client:
            if client.is_connected:
                print(f"Connected to {matched_device.name}")
                # Add your light control behaviour here:

                # Switch on and off
                await switch(client, "OFF")
                await switch(client, "ON")
                await change_colour(client, "052df7") # blue
                await set_brightness(client, 50)  # 50% brightness

            else:
                return "Failed to connect to the light."
    else:
        return "Light not found. Make sure the device is powered on and in range."
Turn lights on and off:
async def switch(client, toggle="ON"):
    characteristic_uuid = "0000FFF3-0000-1000-8000-00805F9B34FB"
    value = "7e0404f00001ff00ef" if toggle == "ON" else "7e0404000000ff00ef"
    await client.write_gatt_char(characteristic_uuid, bytes.fromhex(value))
    await asyncio.sleep(0.5)
    print(f"Turned light {toggle}")
Change colour:
async def change_colour(client, hex_code="0f2efa"):
    await client.write_gatt_char(
        "0000FFF3-0000-1000-8000-00805F9B34FB",
        bytes.fromhex(f"7e070503{hex_code}10EF")
    )
    await asyncio.sleep(0.5)
    print(f"Changed colour to {hex_code}")
Change brightness:
async def set_brightness(client, percentage):
    if percentage < 0 or percentage > 100:
        raise ValueError("Brightness percentage must be between 0 and 100.")
    brightness_value = f"{round(percentage * 255 / 100):02x}"
    await client.write_gatt_char(
        "0000FFF3-0000-1000-8000-00805F9B34FB",
        bytes.fromhex(f"7e0401{brightness_value}0000ef")
    )
    await asyncio.sleep(0.5)
    print(f"Set brightness to {percentage}%")
Usage:
if __name__ == "__main__":
    turn_bluetooth_on()
    devices = asyncio.run(scan_ble_devices())
    asyncio.run(connect_to_light(devices))
I used ChatGPT to help me write the first draft for this (e.g. how to connect to ble device with python, how to write to a ble device characteristic). Then I cleaned it up a bit.
To use this for your own lights, you need to change the device address, the characteristic UUID and the value codes written to your lights.
Step 5: Repeat for your other lights
Repeat this whole process for all of your other lights. Then update your script to:
Make each light interchangeable, so they can all respond to the same commands even if they implement them differently. In Python, you can use an abstract class to define the blueprint for the light behaviours. Then create a class for each light that uses it, but implements the commands in their own way (this is polymorphism in action).
Enable calling the same commands on multiple lights at the same time (parallel processing). You can do this by grouping commands (on/off, colour etc) for each light into a coroutine in python, then use asyncio.gather to run them all at the same time.
Final Code!
Here is my version, which runs my light interaction code on two lights from different brands at the same time.
GitHub Gist: Script for controlling multiple BLE smart lights
Here’s a light being controlled from a single custom remote control script (totally boring video but I love it):
The possibilities of IOT & AI are so magical to me. We’ll be exploring this in future deep dives! In the meantime, if you reverse engineer your own devices, I’d LOVE to see!!! (Share them with me via LinkedIn DM).
Until next time,
Stay sparkly 💖
If you’d like to see more frequent updates, connect with me on LinkedIn 🥰
Moar GenAI Projects! 🤖🧪✨
🎁 Here are some more projects to check out if you loved this one!
Extract clips from videos based on a prompt, using OpenAI's GPT-4o model.

Build a prompt-based video clip extracter using OpenAI's GPT-4o model. In this project, we extract all clips where Will Smith wears sunglasses in the 1997 Men In Black movie trailer.
#8. ChatGPT-Powered Robot Panda

Helloooo AI Alchemists! ✨🤖🧪 Late last year, my friend Stan and I won the People’s Choice Award at Fishburner’s Young Entrepreneur Pitch night, where I demo’d chatting with the panda on stage in front of 200+ founders and entrepreneurs 🐼🎤 The CEO of Fishburners said:
#2. Analyse a journal entry for unhelpful thinking patterns with ChatGPT's function calling 🤯

Helloooo AI Alchemists! ✨🤖🧪 Last weekend, I built a program that I’ve personally wished existed for years. It’s solved a real pain point for me, and I’m so grateful it was even possible. Not only was it possible, but it was easy. Crazy easy. This is it:
✨ Fairylights | 100 GenAI Projects is a reader-supported publication. To receive new posts and support my work, consider becoming a free or paid subscriber.